Key Takeaways
- The overhead press is one of the single best exercises for building your chest, shoulders, and arms.
- Proper overhead press form boils down to a few simple habits and effective cues (which you’ll learn in this article).
- Keep reading to learn exactly how to overhead press with proper form and the five best overhead press variations, and to get a free 12-week overhead press training program!
The overhead press is the grubby cousin of weightlifting exercises.
Most people know it exists, but rarely give it attention or pay it much respect. They look at it like a weaker, less glamorous bench press.
In fact, it’s rare to see anyone overhead pressing in gyms these days, which is a shame. For years, it was considered the purest test of upper body strength, much like the bench press is today.
And as the author and strength training coach Mark Rippetoe writes in Starting Strength, “Pressing the barbell overhead is still the most useful upper-body exercise in the weight room.”
I agree—the overhead press is one of the best exercises for improving upper body strength, chest, shoulder, and arm size, and whole-body balance and coordination.
So, why has the overhead press faded into obscurity?
Well, bodybuilding is largely to blame.
Around the 1950s, bodybuilders began to prize chest development over shoulder size, which caused many weightlifters to abandon the overhead press for its supine counterpart.
Then, in 1972, the overhead press was removed from the Olympics, further decreasing its popularity, and powerlifting began to catch on, which emphasizes bench pressing over military pressing.
Finally, there’s also the fact that the bench press is easier to learn than the overhead press and lets you move much heavier weights, making it especially appealing to new lifters.
If you’re willing to go against the grain, though, and devote time, energy, and attention to the overhead press, you’ll be richly rewarded in ways the bench press can never match.
The fact is if you want to build big, strong, well-rounded shoulders and muscular, defined arms as quickly and effectively as possible, you want to get strong on the overhead press.
And that’s what this article will teach you.
Specifically, you’ll learn . . .
- What the overhead press is
- What muscles the overhead press trains
- How to overhead press with proper form
- The three best overhead press variations
- Overhead press strength standards for men and women
If you don’t want to get into all of that, though, and you just want a science-based overhead press training program for getting bigger and stronger, then here you go:
What’s more, if you want to easily plan and track your workouts, just enter your email address below, and I’ll send you 12-weeks’ worth of workout programming based on these routines.
What Is the Overhead Press?
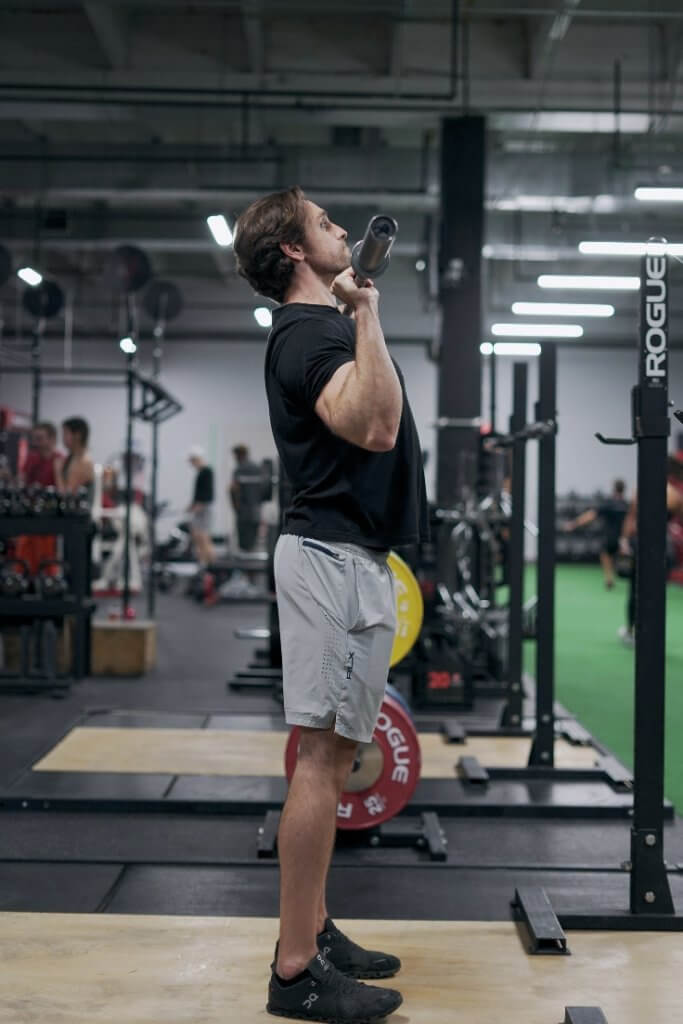
The overhead press, also known as the press, is a standing exercise that involves pushing a barbell over your head until your arms are fully extended.
Here’s what it looks like:
As you can see, you’re moving the barbell using only your arm, shoulder, and chest muscles—you aren’t using your lower body to help.
Simple enough.
That said, there are quite a few variations of the overhead press, so let’s review the most common ones.
Overhead Press vs. Military Press
There’s no official definition of the military or overhead press, and thus most people use the terms interchangeably.
In Starting Strength, though, Mark Rippetoe defines the military press this way: “A military press is performed without any bend of the hips or back used to start the weight, sometimes with the heels together.”
During the overhead press, it’s normal to move your torso forward and your hips back as the bar rises above the top of your head, which helps you force the weight upward. With the military press, though, your upper and lower body remain more or less motionless.
Most people still use the terms synonymous, though, and even when military pressing, your hips and torso will move slightly, blurring the difference. That is, at this point, the distinction is mostly academic and meaningless.
For what it’s worth, I favor “overhead press” because it’s more descriptive than “military press,” but just know they basically mean the same thing.
Read: The Ultimate Guide to the Military Press: The Key to Great Shoulders
Overhead Press vs. Push Press
The push press is basically an overhead press that begins with a quarter squat to help start the bar upward. As you rise from the squat, you press the bar upward until your arms are locked overhead.
Here’s what it looks like:
We’ll talk more about how to do the push press later in this article.
Seated vs. Standing Overhead Press
The traditional overhead press is performed in a standing position, and if it’s performed seated, it’s now a “seated overhead press.”
Here’s what it looks like:
Soon, we’ll talk more about this variation as well.
Overhead Press vs. Behind-the-Neck Press
The behind-the-neck press works the same way as the overhead press, except instead of touching the bar to your chest, you lower it behind your head until it either touches the base of your neck or is at about the level of your ears (depending on your preferences and mobility).
Here’s what it looks like:
Many people say the behind-the-neck press is dangerous—it certainly looks like a one-way ticket to snap city—but the reality is less dramatic. Although those with poor shoulder mobility can irritate their shoulders and neck muscles with this exercise, many of us can do it without discomfort.
That said, the behind-the-neck press forces you to use significantly less weight and doesn’t offer any advantages over the overhead press, which is why I don’t recommend it.
Summary: The overhead press involves standing and pushing a barbell over your head until your arms are fully extended.
What Muscles Does the Overhead Press Train?
Many people think the overhead press only trains the shoulders, and for good reason: it’s one of the best shoulders exercises you can do.
It also trains your triceps, forearms, and even your upper chest to a certain degree, however.
Specifically, the overhead press helps develop your . . .
- Deltoids
- Trapezius
- Triceps
- Forearms
- Pectoralis major and minor
What’s more, the stronger you get on the overhead press, the more you’ll need to involve other muscle groups like your lats, abs, glutes, and legs to stabilize your body, making it a full-body exercise at heavier weights.
Read: The Best Way to Train All 6 Major Muscle Groups
Summary: The overhead press primarily trains your shoulders, triceps, chest, and forearms, but also trains your back, abs, glutes, and legs to a certain degree, especially as you get stronger.
Is the Overhead Press Safe?
You may have heard that the overhead press can cause shoulder pain. This is true if you have poor shoulder mobility, but it’s otherwise uncommon.
“What about shoulder impingement syndrome, though?” you may be wondering after poking around online.
In case you’re not familiar with it, this is a condition where tendons and other connective tissues get pinched between the bones of the arm and shoulder joint.
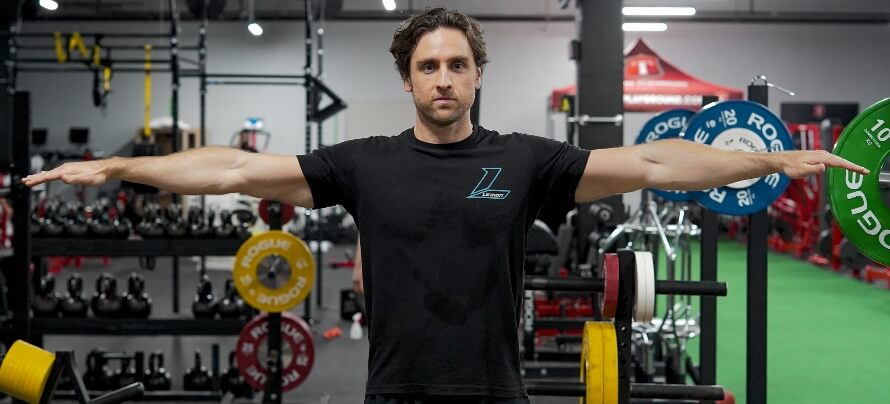
While shoulder impingement syndrome can occur during any sport that involves lots of arm movement, the overhead press isn’t a common culprit. To understand why, let’s use a little demonstration developed by Mark Rippetoe.
Stand up straight, and raise your arms until they’re parallel with the floor with your palms facing the floor, like this:
Now, bending at your belows, bring your hands in toward your chest until your arms are at right angles, like this:

Now raise your elbows a few inches higher, like this:
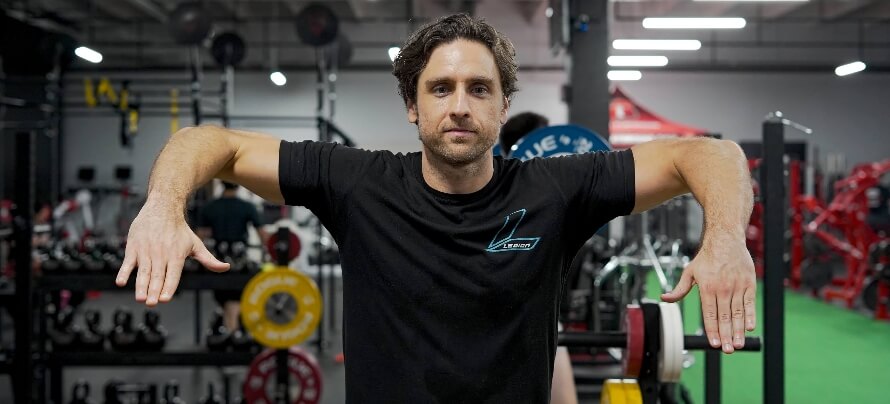
If you’re like most people, you’ll feel pressure and discomfort in your shoulders if you try to raise your elbows higher while in this position. That’s shoulder impingement.
(This is also more or less the same arm position swimmers use while doing the crawl, which is part of why swimmers injure their shoulders more than any other part of their body).
Now, return to the first position with your arms straight and out to your sides. Then, get into a “hands up” position, like this:

Extend your arms toward the ceiling until your elbows lock, and shrug your shoulders toward the ceiling as high as they’ll go, like this:
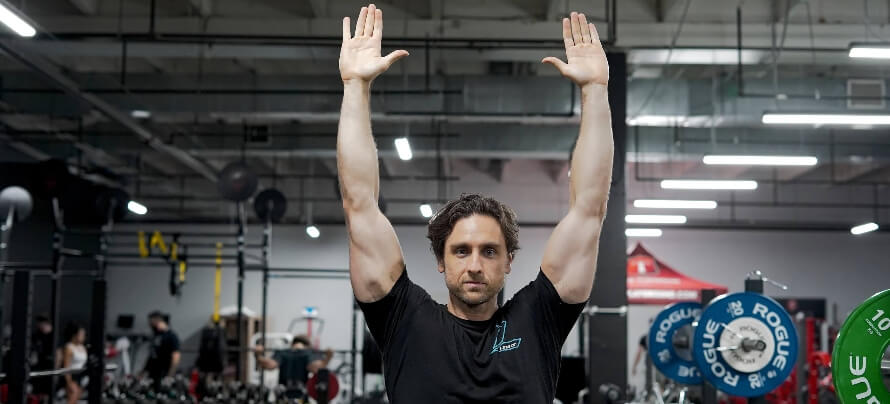
If you’re like most people, you shouldn’t feel any pressure, discomfort, or pain. This is more or less the same position your arms will be in at the top of the overhead press.
The reason this top position doesn’t usually cause shoulder impingement is your shoulder blades “slide” out of the way of your upper arms when you extend them over your head, making room for the tendons and other connective tissues that would normally get stuck.
As Rippetoe says, “It is therefore anatomically impossible to impinge the rotator cuff tendons in a correctly-performed press.”
So, what does cause shoulder impingement? It varies from person to person, but the main factors are:
- Sports that force you to use an awkward shoulder position, like swimming, tennis, and baseball.
- Repetitive use—repeating the same arm movement over and over again, especially with the arms overhead (think painting a house all day).
- Poor mobility, which makes it harder to retract the shoulder blades and fully extend the upper arms.
Read: The 7 Best Ways to Fix and Prevent Shoulder Pain
Summary: Overhead pressing is healthy for your shoulders so long as you use proper technique.
How to Overhead Press with Proper Form
There are three steps to overhead pressing with proper form:
- The setup, where you position your body to press safely and effectively.
- The ascent, where you push the weight above your head.
- The descent, where you lower the weight back to your shoulders and prepare for the next rep.
Every aspect of overhead press technique—grip width, foot placement, back angle, elbow position, and the rest of it—can be filed under one of these three categories.
Let’s go through each of them in detail, starting with the setup.
Proper Overhead Press Step 1: The Setup
A proper overhead press setup involves just five steps:
- Rack the bar.
- Position the bar.
- Grip the bar.
- Unrack the bar.
- Position your feet.
That’s it.
Let’s take a closer look at each of these steps.
1. Rack the bar.
First, make sure the rack isn’t too high or too low.
You should be able to unrack the bar without having to half-squat it off the pins and without having to get up on your tippy toes.
A good rule of thumb is racking the bar one to two inches below its starts position in the lift, or around the top of your breastbone, like this:
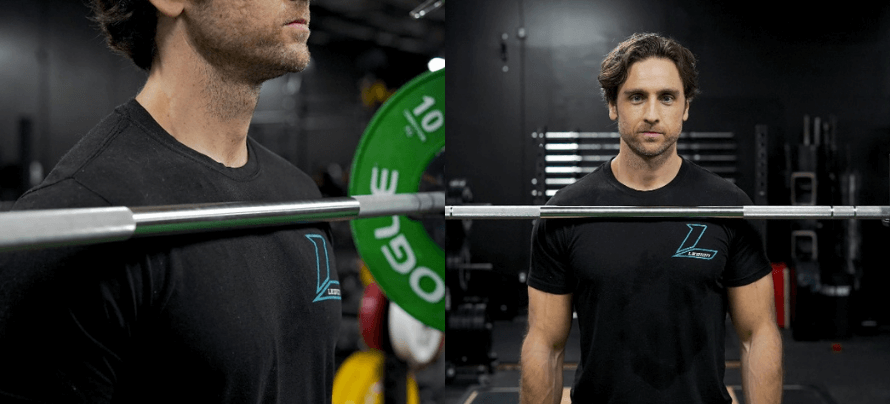
2. Grip the bar.
Grip the bar about shoulder-width apart with your palms facing away from you.
Hold the bar low in your hands, closer to your wrists than your fingers, and squeeze it as hard as you can.
Your wrists should be bent just enough to allow the bar to settle into the base of your palms, but not folded back at a 90-degree angle. This prevents wrist pain.
Here’s how this looks:

Many people overhead press using a slightly wider grip than this—something more akin to the bench press or even wider—to make the exercise a bit easier by reducing the range of motion.
This is generally a bad idea.
Read: Are Full or Partial Reps Better for Building Strength and Size?
Overhead pressing with too wide of a grip makes the beginning of each rep harder than it should be and makes it more difficult to properly stabilize your torso once the bar clears your head.
Plus, reducing the range of motion reduces the overall effectiveness of the exercise.
So, place your hands in line with or just outside your shoulders, and your forearms parallel with one another and perpendicular to the bar, like this:
A common mistake people make in setting up for the overhead press is flaring their elbows out to the sides once they’re underneath the bar. This causes the bar to tip forward and reduces your torso tightness, which makes it harder to initiate the press and get the bar over your head.
Instead, you want your elbows close to your sides and extended a few inches in front of the bar, placing it high on your shoulders and over your midfoot.
Most people use a full grip with their thumbs wrapped around the barbell when overhead pressing, and others prefer a thumbless “suicide” grip, which looks like this:

I recommend you use the gull grip because it’s stronger and safer. It also allows you to squeeze the bar as hard as you can, which is a helpful cue for pushing heavier weights.
That said, if you find the thumbless grip more comfortable, you can use it, but be careful. It’s fairly easy to duck out of the way of a failed rep on the overhead press (unlike the bench press), but you still need to be on your toes.
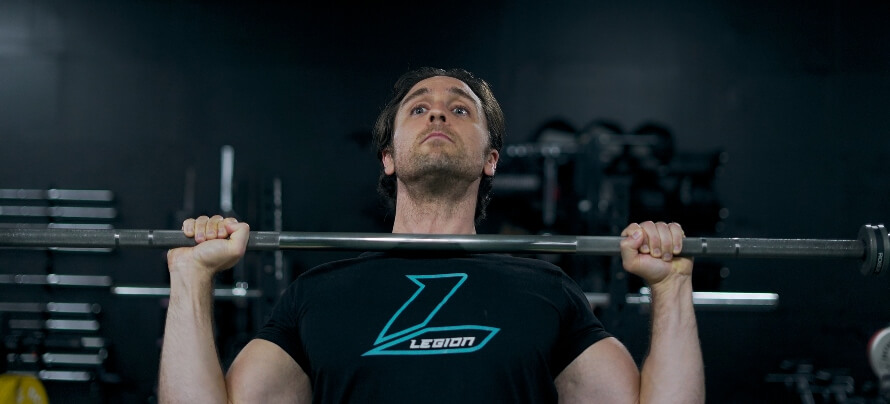
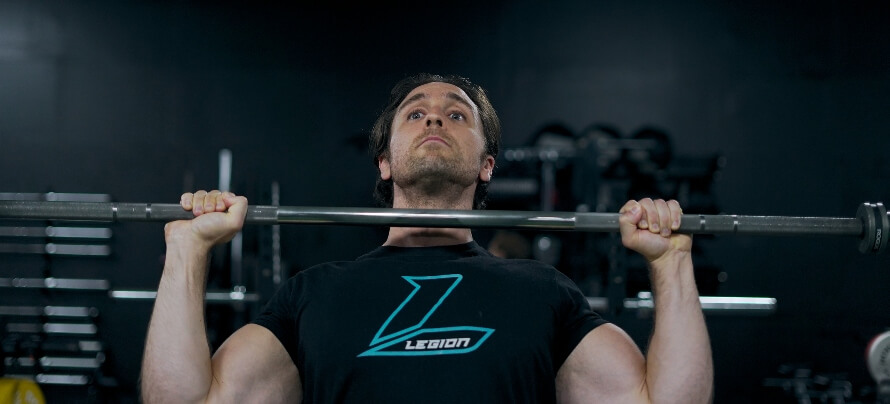
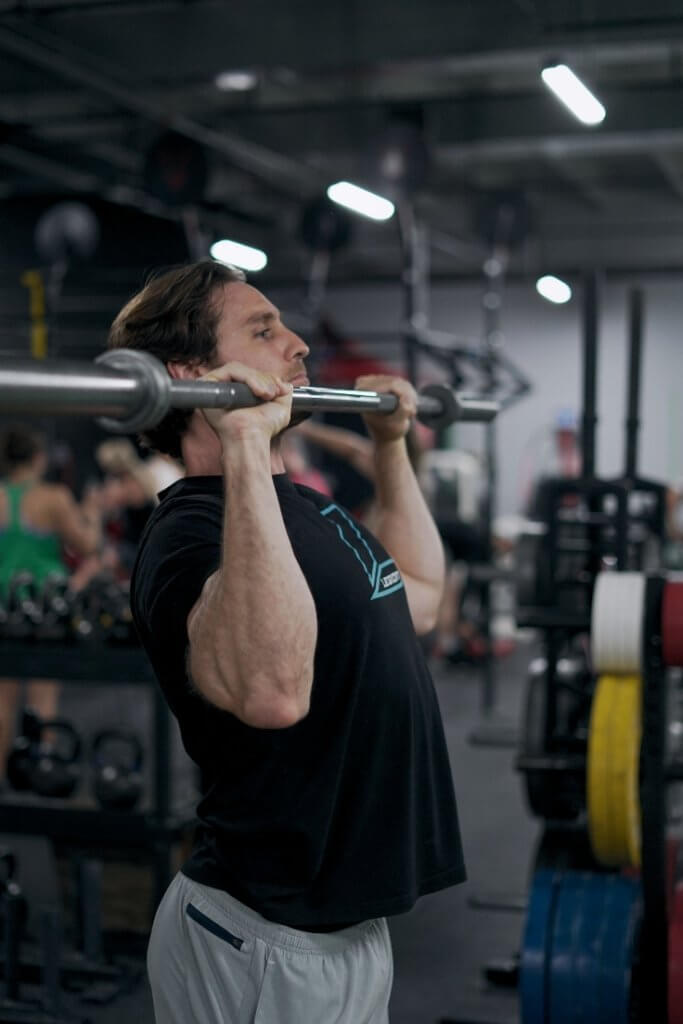
3. Position the bar.
Push your elbows in toward your body and slightly in front of the bar, and allow the bar to rest on the tops of your shoulders and upper chest.
Arch your upper back enough so the bar is directly over your midfoot and your head is slightly behind the bar, like this:
Some people say that arching your back in this manner is dangerous, but that’s nonsense. As long as you don’t have a previous back injury, a slight backward lean isn’t bad for your spine and is required to overhead press correctly.
Some people also prefer to hold the barbell in their hands throughout each set instead of resting the bar across their chest and shoulders, like this:
This method can work, but I prefer to bring the bar to the top of my chest and shoulders with each rep because it ensures I’m using a full range of motion.
If you’re new to the overhead press, you’re probably going to find this aspect of the exercise uncomfortable at first. Like the front squat, you’ll eventually get used to the position, but if it’s unbearable when you start out, simply use lighter weights until you’ve gotten used to the feeling.
Most people find the discomfort goes away after their first three to five overhead press workouts.
4. Unrack the bar.
Put your feet directly under the bar (not behind it), take a deep breath, raise your chest, push your elbows just in front of the bar, and lift the bar off the rack.
Take one step back with each foot, making sure the first is firmly planted before moving the other.
Don’t take several baby steps backward. This wastes energy and forces you to move farther to re-rack the bar at the end of your set, which can be dangerous.
Here’s a short video of what this should look like.
5. Position your feet.
Figuring out your ideal stance width will require some trial and error, but to start, position your feet just outside of shoulder-width, like this:
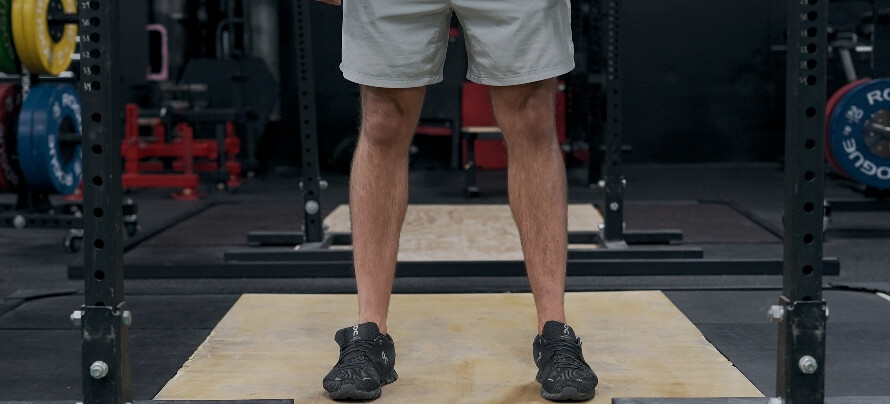
For most people, this is the same position as a back or front squat. If you’re tall, however, you may also want to position your feet a little closer together than this.
What matters most is that you can properly stabilize the weight as you press the bar upward, so whatever stance width helps you do that best is what you should use.
Proper Overhead Press Step 2: The Ascent
Here’s what we want to achieve on the ascent:
I want you to notice a few things in particular:
- The bar is moving straight up and down, not gliding forward or backward.
- My upper back is slightly extended but only enough to allow the bar to pass my face.
- My elbows start just in front of the bar and finish directly underneath it.
- My hips and legs stay more or less motionless through the whole movement (no wobbling).
- My head stays in line with my back.
That’s what you’re going for in a nutshell. Here’s how to do it:
First, take a deep breath, trapping the air in your stomach. As you breathe in, you should feel your stomach expanding, not your chest (like this).
Then, press your tongue against the roof of your mouth, sealing your windpipe. Tighten your core muscles as if you were about to get punched in the gut.
Squeeze your glutes as hard as you can, raise your chest toward the ceiling, tuck your elbows in and slightly forward, and push the bar off your chest and toward the ceiling.
Keep your head in line with your back, and the second the bar passes the top of your forehead, push your torso underneath the bar.
As you get some experience with the overhead press, you’ll notice that if you get stuck on a rep, it’s almost always in the first half of the movement, when you’re trying to get the bar above your head. Once you’ve cleared your noggin, you’re usually home free.
That’s why it’s essential to initiating each rep by forcing the bar off your chest as hard as you can, and then pushing your head underneath the bar as you continue pressing it toward the ceiling.
Keep pushing the bar until your elbows are locked above your head, at which point you’re ready for the descent.
Proper Overhead Press Step 3: The Descent
The descent is a reverse image of the ascent:
You lower the bar back to your chest, leaning your head and upper back a few inches backward to allow the bar to pass in front of your face.
The biggest mistake people make in the descent is allowing the bar to drift forward for fear of hitting their head or face. While this protects you from whacking your face, it also throws off your balance and wastes energy.
This is why you want to lower the bar straight down, no more than an inch or two in front of your nose, until it comes to rest on your upper chest and shoulders, like this:
Once the bar is back in its original position, push it up again as hard as you can, preferably with little to no pause between reps until you’re done with your set.
5 Overhead Press Variations You Should Know
In addition to the traditional overhead press, which involves standing upright, gripping a barbell in two hands, and pushing it overhead, there are three other variations of this exercise worth knowing and doing.
Four of these can be done in addition to or instead of the regular overhead press, and one should be avoided if possible.
Here they are:
- The seated overhead press
- The push press
- The dumbbell overhead press
- The dumbbell Arnold press
- The Smith machine overhead press
Let’s look at each.
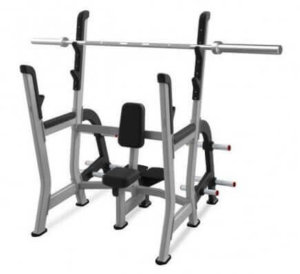
The Seated Overhead Press
The seated overhead press is identical to the standing press, except it’s done while seated on a bench instead of standing on your feet.
The seated overhead press requires either a dedicated station, like this . . .
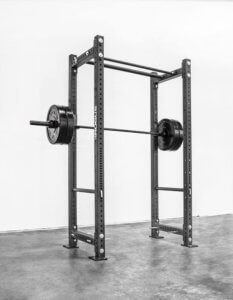
Or a squat rack or power cage-like these . . .
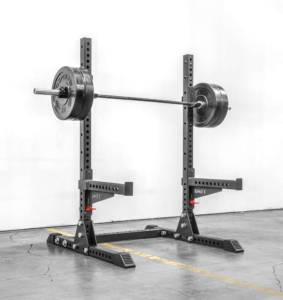
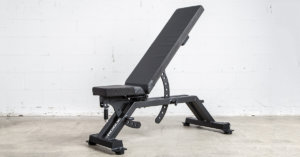
Plus a weightlifting bench, like this . . .
To do the seated overhead press, place your feet flat on the ground about shoulder-width apart with your toes and knees slightly turned out.
Press your heels into the ground to keep your upper back and butt rooted in place against the back of the bench.
The rest of the movement is just like a standing overhead press.
Here’s how it looks:
The first thing you’ll notice about the seated overhead press is it’s significantly easier than the standing press.
This is why many well-informed strength training experts like Mark Rippetoe say the standing variation is better for developing whole-body strength and muscularity, and science agrees.
A study conducted by scientists at FacSogn og Fjordane University College supports this claim.
In this study, the researchers had 15 young, healthy lifters perform both the seated and standing overhead press with 80{740fcf70e3ac1f1193a1b542e1c9e953922ad085105f0bf8299e70261e238f62} of their one-rep max (1RM). The researchers also attached electrodes to the men’s deltoids, biceps, and triceps to measure muscle activation.
To record muscle activation, they used an electromyograph (EMG), which measures the electrical activity within a muscle. More electrical activity within a muscle indicates more muscle fibers contracting, which translates into a more powerful stimulus for muscle growth.
The researchers found that overall muscle activation was slightly higher in the standing versus seated overhead press, but the differences weren’t huge.
That said, there are a few drawbacks to the standing overhead press that you should be aware of:
- You won’t be able to move as much weight.
- You’ll progress slower.
- You’ll need more time to get good at it.
You see, the standing overhead press isn’t just a shoulder exercise—it’s a whole-body exercise that requires many supporting muscle groups to engage and work together, including the abs, lats, and lower back.
This is why most people find they can press about 10{740fcf70e3ac1f1193a1b542e1c9e953922ad085105f0bf8299e70261e238f62} more weight when seated versus standing and progress to heavier weights faster.
This makes the standing overhead press better in terms of whole-body muscle activation, but worse if your main goal is to target your shoulders as much as possible. For maximally overloading your shoulders, the seated press is superior because you aren’t limited by the strength of smaller, supporting muscle groups or your balance.
For my part, I prefer the seated overhead press for most of my training because my heavy deadlifting, rowing, and squatting is more than enough for training my core and back. When I’m training shoulders, I want to focus on them as much as possible.
That said, I do opt for the standing overhead press every few training blocks or so just to maintain familiarity with it and to enjoy a new challenge.
The Push Press
The push press is basically a standing overhead press that begins with a quarter squat to help move the bar upward. As you rise from the squat, you press the bar above you until your arms are locked overhead.
Here’s what it looks like:
“So it’s just a sloppy overhead press?” you might be wondering. Not quite.
The point of the push press is to generate just enough momentum to help get the bar off the shoulders and through the first few inches of movement, where it’s most likely to get stuck. From there, your shoulders and arms do all the work.
This allows you to use heavier weights than with the standing overhead press without reducing range of motion much.
A downside to the push press, though, is it’s hard to judge your progress if you don’t duplicate the boost rep to rep, set to set, and workout to workout. If you often squat differently, your weights might go up, but your shoulders and arms might do less work.
The push press also makes it easier to “cheat” by giving the bar more of a boost than necessary, reducing the effectiveness of the exercise. That said, with practice you’ll standardize the force generated by your squats, and you’ll realize when you’re helping a little more than you should.
As for how to do the push press, set up the same way you do for the standing overhead press, and instead of immediately pushing the bar straight up, drop your butt three to six inches, and then shoot your hips upward as explosively as you can.
Once you reach the top of the hip thrust, keep your heels on the ground and push the bar up with your arms. Keep pushing until your elbows are locked overhead.
Then, lower the bar back to the top of your shoulders as you would in a overhead press (some people like to bend their knees again to “catch” the bar as it descends), take a breath, and you’re ready for the next rep.
The Seated Dumbbell Overhead Press
The seated dumbbell overhead press is more or less identical to the seated overhead press except it’s done with dumbbells instead of a barbell.
Here’s how it looks:
The main advantage of using dumbbells is they allow you to make subtle adjustments to your technique during each rep to make the exercise more comfortable (this is why people with shoulder injuries often prefer to use dumbbells over barbells).
They also work better for correcting and preventing muscle imbalances as well as challenging your muscles in slightly different ways that could (theoretically) lead to more muscle growth.
The main disadvantage of the seated dumbbell overhead press is it takes more balance and coordination than the seated barbell press, which means you can’t use as much weight.
For example, my best seated overhead press is 225 for a couple reps, but my best seated dumbbell overhead press is 180 pounds (90 pounds in each hand) for a few reps, or about 15{740fcf70e3ac1f1193a1b542e1c9e953922ad085105f0bf8299e70261e238f62} less.
Dumbbells are also much more difficult to get into the starting position than a barbell, which further limits how much weight you can use.
The standing dumbbell overhead press is even tougher in this way, which is why I don’t do it unless I have no other option. For example, during the 2020 COVID-19 lockdowns, I did standing dumbbell presses as part of my home workout routine, but I don’t do them when I have access to a gym.
Read: The Best Home Workout Routines for When You Can’t Go to the Gym
Unless you’re a complete beginner, it requires too much effort to simply get heavy dumbbells into the starting position—effort that’s better applied toward actual pressing instead.
Practically speaking, I wouldn’t say the seated dumbbell overhead press is better than the seated barbell overhead press or vice versa.
Like the bench press, I’ve found dumbbell and barbell overhead pressing to be complementary and have included both in my workout routines for some time now. Both require strength and stability in slightly different ways and both produce good results, and so I like to alternate between them.
Specifically, I like to do 8 to 12 weeks of barbell pressing followed by 8 to 12 weeks of dumbbell pressing.
The Dumbbell Arnold Press
The dumbbell Arnold press is a variation of the traditional dumbbell overhead press that increases the range of motion.
Here’s how it looks:
Due to the additional work your shoulders have to do, the Arnold press reduces how much weight you can use, though. This is why I like to do it after a traditional overhead press.
In other words, I treat the Arnold press as an “accessory exercise” for my anterior (front) and side (lateral) deltoids.
Here’s how to do it:
The Smith Machine Overhead Press
Many gyms lack a dedicated overhead press station and many people don’t feel like setting up in a squat rack or power cage, so it’s common to see overhead pressing on the Smith machine.
That’s (usually) a mistake.
Research shows that the Smith machine results in less muscle and strength gain than a free barbell when bench pressing and squatting, and it’s reasonable to assume the same would hold true of overhead pressing.
Read: The Definitive Guide on How to Bench Press (and the 8 Best Variations!)
The reason why is simple: Smith machine exercises produce less muscle activation than their free weight counterparts.
Some people might say the Smith machine is safer than free weight barbell exercises, but this isn’t necessarily true if you learn and stick to proper form.
So, stay off the Smith machine and stick to the proper barbell overhead press if you can avoid it. And if your gym doesn’t have an overhead press station, squat rack, or power cage, stick with dumbbells.
The one situation where using a Smith machine might make sense is if you’re using a hotel gym or another gym that doesn’t have a squat rack, power cage, or dumbbells heavy enough to be challenging for you. In that case, you have permission to overhead press using the Smith machine. 😉
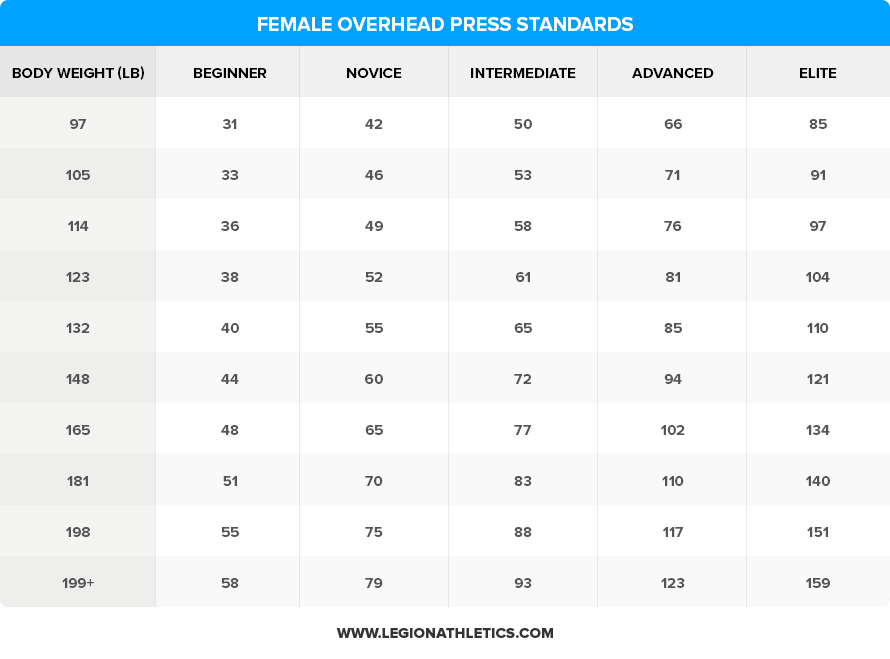
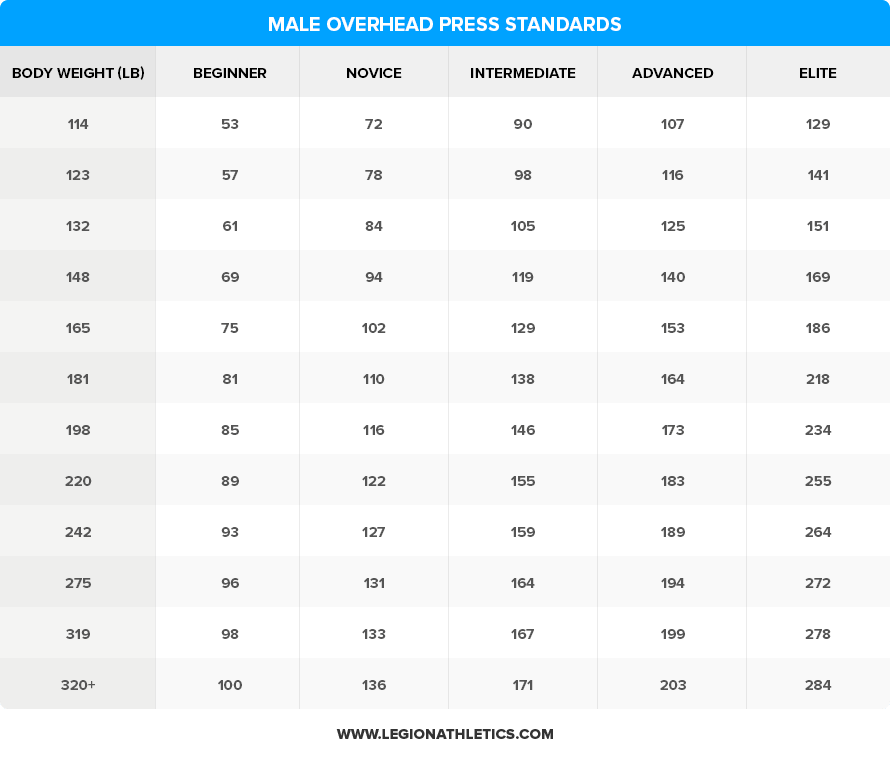
Overhead Press Strength Standards for Men and Women
Whether you’re brand new to overhead pressing or an old hand, it’s nice to have some targets to shoot for.
In strength training, these are called strength standards—objective benchmarks for gauging your progress.
You can find many different overhead press strength standards floating around online, but my two favorites come from powerlifter and powerlifting coach Tim Henriques and, of course, Mark Rippetoe.
I like Henrique’s standards because they’re simple, don’t require any math, and work reasonably well for most people.
Here are his overhead press strength standards for men:
- Decent: 105
- Good: 165
- Great: 225
And here are his overhead press strength standards for women:
- Decent: 45
- Good: 65
- Great: 95
One problem with Henrique’s standards, though, is they don’t take into account body weight. Thus, a guy who weighs 150 pounds and overhead presses 200 pounds (very, very strong) would still only be considered “good,” whereas someone who’s 350 pounds and overhead presses 225 (pretty good, but not amazing) would be considered “great.”
That’s why I like to use Henrique’s standards in conjunction with Rippetoe’s yardsticks, which factor in the person’s body weight. Rippetoe’s also include a few more “levels,” which gives you more milestones to shoot for as you get stronger.
Here they are:
A Simple and Accurate Overhead Press Calculator
It’s fun to know how your strength stacks up against other guys and gals in the gym, but there’s a better reason to care:
Knowing (or at least estimating) the maximum amount of weight you can overhead press can make your training significantly more effective.
More specifically, knowing your one-rep max—how much weight you can overhead press for a single repetition with proper—helps you maintain optimal workout intensity (and thereby achieve optimal results) and track your progress over time.
In other words, it allows you to train hard enough to get the maximum muscle-building stimulus out of every workout, without training so hard that you increase the risk of getting injured or running into symptoms related to overtraining.
This is particularly important if you’re serious about getting stronger on the “big lifts” like the bench press where you’re moving the heaviest weights.
Now, the only surefire way to know how much weight you can bench for a single rep is to actually do it, but that comes at a cost.
A true one-rep max bench press attempt is time-consuming, risky, and exhausting.
Instead, I recommend you do what’s called a “rep-max test,” which involves doing as many reps as possible with a weight that’s slightly less than your true one-rep max.
This is much easier to prepare for and recover from, is far less dangerous, and is almost as accurate as a true one-rep max test. Once you know your rep-max, you can plug those numbers into an equation that will estimate your true one-rep max.
For example, if you overhead press a weight that allows you to get five reps before reaching failure, you can then plug the weight and reps into a calculator to estimate your one-rep max.
You can read this article to learn more about exactly how to conduct a rep-max test, but here’s the gist:
Pick a weight that you’re confident you can overhead press for at least three to five reps with proper form. After a thorough warm up, do as many reps as possible before reaching failure.
If you get more than 8 reps, add 10 pounds (men) or 5 pounds (women) and try again. Plug these numbers into the overhead press calculator below to see how much weight you should be pressing for a certain number of reps.
Every 8 to 12 weeks or so, it’s worth doing another rep-max test to see how your numbers are trending.
If your estimated one-rep max is going up over time, keep doing what you’re doing.
If your numbers stall, check out this article to learn how to break through weightlifting plateaus and keep getting stronger:
Read: 6 Proven Ways to Break Through Weightlifting Plateaus
Summary: Every 8 to 12 weeks, do a rep-max test to estimate your overhead press one-rep max and ensure that you’re getting stronger over time.
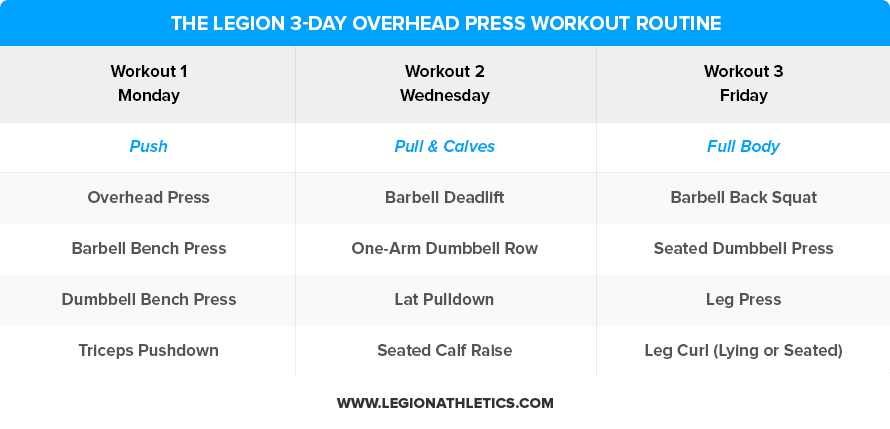
3 Science-Based 12-Week Overhead Press Workout Routines
All right, I think you’ve sniffed enough bread outside the bakery—it’s time to dig in.
If you want to get stronger on the overhead press, you want to do three things:
- Overhead press at least once or twice per week.
- Overhead press at the beginning of your workout at least once per week (when you’re freshest).
- Gradually and systematically increase the amount of weight you use in your workouts to get stronger.
If you have a firm grasp of workout programming, you can run with those guidelines and create an effective overhead press training plan, but if you’re not sure what to do, you can just follow mine instead.
If you’re familiar with my Bigger Leaner Stronger and Thinner Leaner Stronger programs, you’ll immediately recognize that these workout routines are basically adaptations of those programs that place more emphasis on the overhead press than the bench press.
To make these workouts as easy as possible to follow and track, I’ve also formatted them in a series of Google Sheets for you to download. Just enter your email address below, and I’ll send them to you.
Here are the workout plans:
How to Progress in Your Overhead Press Workouts
As a natural weightlifter, here’s something you can take to the bank:
If you want to keep getting bigger, you have to keep getting stronger.
This is more important than getting a pump, increasing time under tension, and incorporating special training techniques like rest pause sets, periodization, and the like.
The reason for this is the number-one rule of muscle building is progressive overload, which is the process of gradually increasing the amount of tension on your muscle fibers over time.
And the best way to do this is to lift heavier weights for more sets.
That’s why the biggest guys and gals in the gym are generally the strongest.
With that in mind, here are several guidelines that will help you get the most out of your full-body workouts.
Use Reps In Reserve (RIR) to control your workout intensity.
So, how much weight should you use in your workouts?
My favorite system is something known as Reps in Reserve (RIR).
I describe this system in more detail in this article, but the gist is simple: 1 RIR = 1 rep shy of failure, 2 RIR = 2 reps shy of failure, and so forth.
And for all of these workouts, I recommend you use an intensity of 1 to 2 RIR, which means you want to do as many reps as you can within the prescribed rep range until you feel you can only do 1 or 2 reps more and then stop.
For example, if you’re doing a workout that calls for 3 sets of 4 to 6 reps of squats, you want to pick a weight that allows you to finish each of your sets feeling like you could have done 1 or 2 more reps if you absolutely had to, while completing at least 4 reps and not more than 6.
In my case, that would be around 275 pounds, which I can get 4 to 6 reps with until my form starts to break down (1 to 2 RIR).
When you first start a new program, it’s a good idea to stay further away from failure (2 RIR) while you familiarize yourself with the exercises and rep ranges. As you groove in your technique and add weight, though, you can progress to taking all of your sets to 1 RIR.
If this seems confusing, don’t worry—it’ll become second nature after a bit of trial and error and a few workouts.
Warm up before each workout.
Before your first set of your first exercise of each workout, make sure you do a thorough warm-up.
A warm-up accomplishes several things:
- It helps you troubleshoot your form and “groove in” proper technique (which is particularly important when you’re learning a new exercise).
- It literally warms up your muscles, which can boost your performance and thus muscle and strength gain over time.
In weightlifting, a warm-up consists of doing one or two light sets of an exercise, followed by one or two heavier sets until you’re using a weight that’s about 70{740fcf70e3ac1f1193a1b542e1c9e953922ad085105f0bf8299e70261e238f62} as heavy as the heaviest weight you’ll use that day for that particular exercise.
You don’t necessarily have to warm-up before every exercise, though. Instead, a thorough warm-up before your first exercise should adequately prepare you for the rest of your workout.
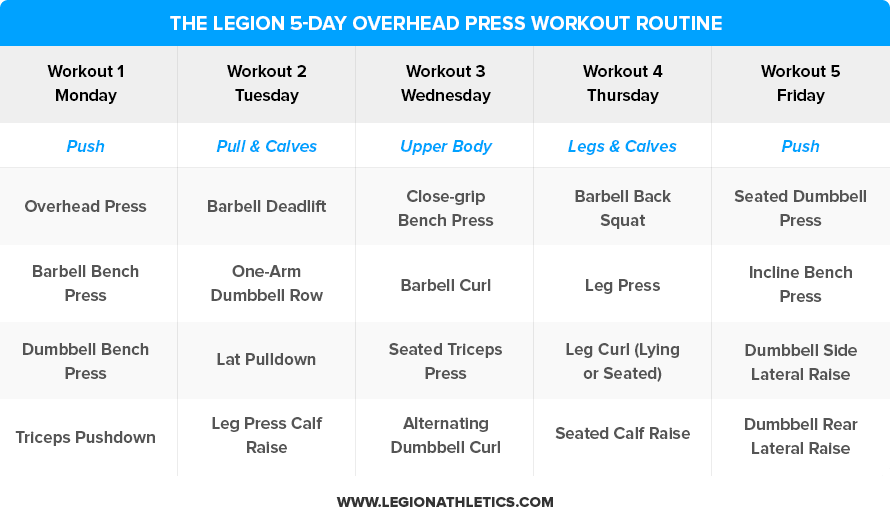
For example, in the Workout 1 of the Legion 5-Day Overhead Press Routine, your first exercise is the overhead press, which will effectively warm up your upper body muscles.
Thus, warming up for the overhead bench press will also warm up all of the muscle groups trained by the barbell bench press, dumbbell bench press, and triceps pushdown, which come after the overhead press.
When you do warm up for an exercise, here’s the protocol you want to follow:
- Estimate roughly what weight you’re going to use for your three sets of flat barbell bench press (this is your “hard set” weight).
- Do 10 reps with about 50 percent of your hard set weight, and rest for a minute.
- Do 10 reps with the same weight at a slightly faster pace, and rest for a minute.
- Do 4 reps with about 70 percent of your hard set weight, and rest for a minute.
Then, do all of your hard sets for your first exercise, and then the rest of the exercises for that workout.
If you want to learn more about the importance of a proper warm-up and how to warm up for different workouts, check out this article:
Don’t go to absolute muscle failure every set.
Absolute muscle failure is the point where you can no longer keep the weight moving and have to end the set.
We should take most of our sets to a point close to technical failure (one or two reps shy of the point where our form breaks down), but we should rarely take sets to the point of absolute failure.
Personally, I never train to failure for more than two to three sets per workout, and never on the squat, deadlift, bench press, or overhead press, as it can be dangerous.
Instead, I reserve my failure sets for isolation exercises like cable flyes, triceps extensions, biceps curls and the like, and it’s usually a natural consequence of pushing for progressive overload as opposed to deliberate programming.
You can learn more about how to take sets close (but not to) failure in this article:
This Is the Best Guide to the RPE Scale on the Internet
Rest 3 to 4 minutes in between each set.
This will give your muscles enough time to fully recoup their strength so you can give maximum effort each set.
If you want to learn more about how long you should rest between sets, check out this article:
How Long Should You Rest Between Sets to Gain Muscle and Strength?
Once you hit the top of your rep range for one set, you move up in weight.
For instance, if you overhead press 135 pounds for 6 reps on your first set, you add 5 pounds to each side of the bar for your next set.
If, on the next set, you can get at least 4 reps with 145 pounds, that’s the new weight you work with until you can press it for 6 reps, move up, and so forth.
If you get 3 or fewer reps, though, reduce the weight added by 5 pounds (140 pounds) and see how the next set goes. If you still get 3 reps or fewer, reduce the weight to the original 6-rep load and work with that until you can do two 6-rep sets with it, and then increase the weight on the bar.
This method is known as double progression, which you can learn about in this podcast:
How to Use Double Progression to Get More From Your Workouts
What About Supplements?
I saved this for last because, quite frankly, it’s less important than proper diet and training.
Supplements don’t build great physiques—dedication to proper training and nutrition does.
Unfortunately, the workout supplement industry is plagued by pseudoscience, ridiculous hype, misleading advertising and endorsements, products full of junk ingredients, underdosing key ingredients, and many other shenanigans.
Most supplement companies produce cheap, junk products and try to dazzle you with ridiculous marketing claims, high-profile (and very expensive) endorsements, pseudo-scientific babble, fancy-sounding proprietary blends, and flashy packaging.
So, while workout supplements don’t play a vital role in building muscle and losing fat, and many are a complete waste of money…the right ones can help.
The truth of the matter is there are safe, natural substances that have been scientifically proven to deliver benefits such as increased strength, muscle endurance and growth, fat loss, and more.
As a part of my work, it’s been my job to know what these substances are, and find products with them that I can use myself and recommend to others.
Finding high-quality, effective, and fairly priced products has always been a struggle, though.
That’s why I took matters into my own hands and decided to create my own supplements. And not just another line of “me too” supplements—the exact formulations I myself have always wanted and wished others would create.
I won’t go into a whole spiel here though. If you want to learn more about my supplement line, check this out.
For the purpose of this article, let’s just quickly review the supplements that are going to help you get the most out of your PPL (and other) workouts.
Creatine
Creatine is a substance found naturally in the body and in foods like red meat. It’s perhaps the most researched molecule in the world of sport supplements—the subject of hundreds of studies—and the consensus is very clear:
Supplementation with creatine helps…
You may have heard that creatine is bad for your kidneys, but these claims have been categorically and repeatedly disproven. In healthy subjects, creatine has been shown to have no harmful side effects, in both short- or long-term usage. People with kidney disease are not advised to supplement with creatine, however.
If you have healthy kidneys, I highly recommend that you supplement with creatine. It’s safe, cheap, and effective.
In terms of specific products, I use my own, of course, which is called Recharge.
Recharge is 100{740fcf70e3ac1f1193a1b542e1c9e953922ad085105f0bf8299e70261e238f62} naturally sweetened and flavored and each serving contains:
- 5 grams of creatine monohydrate
- 2100 milligrams of L-carnitine L-tartrate
- 10.8 milligrams of corosolic acid
This gives you the proven strength, size, and recovery benefits of creatine monohydrate plus the muscle repair and insulin sensitivity benefits of L-carnitine L-tartrate and corosolic acid.
Protein Powder
You don’t need protein supplements to gain muscle, but, considering how much protein you need to eat every day to maximize muscle growth, getting all your protein from whole food can be impractical.
That’s the main reason I created (and use) a whey protein supplement. (There’s also evidence that whey protein is particularly good for your post-workout nutrition.)
Whey+ is 100{740fcf70e3ac1f1193a1b542e1c9e953922ad085105f0bf8299e70261e238f62} naturally sweetened and flavored whey isolate that is made from milk sourced from small dairy farms in Ireland, which are known for their exceptionally high-quality dairy.
I can confidently say that this is the creamiest, tastiest, healthiest all-natural whey protein powder you can find.
I also have the slow-digesting Casein+, which is perfect as your pre-bed protein, or Thrive if you want something that’s 100{740fcf70e3ac1f1193a1b542e1c9e953922ad085105f0bf8299e70261e238f62} plant-based.
Pre-Workout Drink

There’s no question that a pre-workout supplement can get you fired up to get to work in the gym. There are downsides and potential risks, however.
Many pre-workout drinks are stuffed full of ineffective ingredients and/or minuscule dosages of otherwise good ingredients, making them little more than a few cheap stimulants with some “pixie dust” sprinkled in to make for a pretty label and convincing ad copy.
Many others don’t even have stimulants going for them and are just complete duds.
Others still are downright dangerous, like USPLabs’ popular pre-workout “Jack3d,” which contained a powerful (and now banned) stimulant known as DMAA.
Even worse was the popular pre-workout supplement “Craze,” which contained a chemical similar to methamphetamine.
The reality is it’s very hard to find a pre-workout supplement that’s light on stimulants but heavy on natural, safe, performance-enhancing ingredients like beta-alanine, betaine, and citrulline.
And that’s why I made my own pre-workout supplement.
It’s called Pulse and it contains 6 of the most effective performance-enhancing ingredients available:
- Alpha-GPC. Alpha-GPC increases the activity of a chemical in the brain known as acetylcholine. This helps increase power output and increases growth hormone levels.
- Caffeine. Caffeine is good for more than the energy boost. It also increases muscle endurance and strength.
- Beta-Alanine. Beta-alanine is a naturally occurring amino acid that reduces exercise-induced fatigue, improves anaerobic exercise capacity, and can accelerate muscle growth.
- Citrulline Malate. Citrulline is an amino acid that improves muscle endurance, relieves muscle soreness, and improves aerobic performance.
- Betaine. Betaine is a compound found in plants like beets that improves muscle endurance, increases strength, and increases human growth hormone and insulin-like growth factor 1 production in response to acute exercise.
- Theanine. Theanine is an amino acid found primarily in tea that reduces the effects of mental and physical stress, increases the production of nitric oxide, which improves blood flow, and improves alertness, focus, attention, memory, mental task performance, and mood.
And what you won’t find in Pulse is equally special:
- No artificial sweeteners or flavors.
- No artificial food dyes.
- No unnecessary fillers, carbohydrate powders, or junk ingredients.
The bottom line is if you want to know what a pre-workout is supposed to feel like…if you want to experience the type of energy rush and performance boost that only clinically effective dosages of scientifically validated ingredients can deliver…then you want to try PULSE.
The Bottom Line on the Overhead Press
The overhead press, also known as the press, is a standing exercise that involves pushing a barbell over your head until your arms are fully extended.
Many people think the overhead press only trains the shoulders, and it is an outstanding shoulder exercise, but it also trains your triceps, forearms, and chest, and back, abs, glutes, and legs to a certain degree, especially as you get stronger.
Although you may have heard that overhead pressing can cause shoulder impingement syndrome, the truth is that it’s healthy for your shoulders so long as you use proper technique.
Proper overhead press technique boils down to three simple steps, each of which has a few substeps:
1. The Setup
- Rack the bar so that it’s at about the height of your collarbone.
- Grip the bar with a full grip (thumbs wrapped around the bar) with your wrists more or less straight.
- Position the bar so that it’s resting across the front of your shoulders.
- Unrack the bar by taking one step back with each foot, making sure the first is firmly planted before moving the other.
- Position your feel just outside of shoulder-width apart.
2. The Ascent
- Take a deep breath, trapping the air in your stomach.
- Squeeze your glutes as hard as you can, raise your chest toward the ceiling, tuck your elbows in and slightly forward, and push the bar off your chest and toward the ceiling.
- Keep your head in line with your back, and the second the bar passes the top of your forehead, push your torso underneath the bar.
- Keep pushing the bar until your elbows are locked above your head.
3. The Descent
- Lower the bar back to your chest, leaning your head and upper back a few inches backward to allow the bar to pass in front of your face and rest on your shoulders.
- Once the bar is back in its original position, push it up again as hard as you can, preferably with little to no pause between reps until you’re done with your set.
Aside from the overhead press, it’s also worth learning (and doing) a few overhead press variations, such as the . . .
- Seated overhead press
- Push press
- Seated dumbbell overhead press
- Dumbbell Arnold press
- Smith machine overhead press
Remember that if you want to get as strong as possible on the overhead press as quickly as possible, scroll up and download my free 12-week overhead press training program!
If you liked this article, please share it on Facebook, Twitter, or wherever you like to hang out online! 🙂
What’s your take on the overhead press? Have anything else to share? Let me know in the comments below!
+ Scientific References
- Fradkin, A. J., Zazryn, T. R., & Smoliga, J. M. (2010). Effects of warming-up on physical performance: A systematic review with meta-analysis. Journal of Strength and Conditioning Research, 24(1), 140–148. https://doi.org/10.1519/JSC.0b013e3181c643a0
- Gabriel, D. A., Kamen, G., & Frost, G. (2006). Neural adaptations to resistive exercise: Mechanisms and recommendations for training practices. In Sports Medicine (Vol. 36, Issue 2, pp. 133–149). Sports Med. https://doi.org/10.2165/00007256-200636020-00004
- Schoenfeld, B. J. (2010). The mechanisms of muscle hypertrophy and their application to resistance training. In Journal of Strength and Conditioning Research (Vol. 24, Issue 10, pp. 2857–2872). J Strength Cond Res. https://doi.org/10.1519/JSC.0b013e3181e840f3
- Amarante do Nascimento, M., Serpeloni Cyrino, E., Yuzo Nakamura, F., Romanzini, M., José Cardoso Pianca, H., & Roberto Queiróga, M. (n.d.). Validation of the Brzycki equation for the estimation of 1-RM in the bench press. In Rev Bras Med Esporte (Vol. 13).
- Schwanbeck, S., Chilibeck, P. D., & Binsted, G. (2009). A comparison of free weight squat to Smith machine squat using electromyography. Journal of Strength and Conditioning Research / National Strength & Conditioning Association, 23(9), 2588–2591. https://doi.org/10.1519/JSC.0b013e3181b1b181
- Schick, E. E., Coburn, J. W., Brown, L. E., Judelson, D. A., Khamoui, A. V., Tran, T. T., & Uribe, B. P. (2010). A comparison of muscle activation between a Smith machine and free weight bench press. Journal of Strength and Conditioning Research, 24(3), 779–784. https://doi.org/10.1519/JSC.0b013e3181cc2237
- Saeterbakken, A. H., & Fimland, M. S. (2013). Effects of body position and loading modality on muscle activity and strength in shoulder presses. Journal of Strength and Conditioning Research, 27(7), 1824–1831. https://doi.org/10.1519/JSC.0b013e318276b873
- Wanivenhaus, F., Fox, A. J. S., Chaudhury, S., & Rodeo, S. A. (2012). Epidemiology of Injuries and Prevention Strategies in Competitive Swimmers. In Sports Health (Vol. 4, Issue 3, pp. 246–251). SAGE Publications. https://doi.org/10.1177/1941738112442132
If you enjoyed this article, get weekly updates. It’s free.
Sending…
Great! You’re subscribed.
100{740fcf70e3ac1f1193a1b542e1c9e953922ad085105f0bf8299e70261e238f62} Privacy. We don’t rent or share our email lists.